Creating a site to site VPN to Azure using Azure tools
Cloud deployments tend to come in one of two flavours, they are there to host services directly on the internet or there are there to extend your existing on premises infrastructure.
For the second use case, the best approach is to treat the cloud as another site just as you would as if you got a new office or datacentre. Using the cloud like this is just a matter of giving the cloud virtual network an IP range and then setting up a site to site VPN so that it appears as just another remote site.
Fortunately, cloud providers provide tools to allow for setting up site to site VPN’s and this approach is always preferable to hosting your cloud resources using public IP addresses.
On the Azure side I will be using only the Azure provided tools and for the on prem side, I will be using PFSense but you can substitute any decent firewall or router solution. As I will show later in the blog, Azure offer options to download configurations settings for various security vendors which you can copy and paste to bring up the VPN tunnel.
My main reason for using PFSense is that I find that it has an easier interface to work with for these sorts of configurations and it acts as the router for all my lab systems. It is also a VM so when I need to add more nics to it, I do not need to do any physical work.
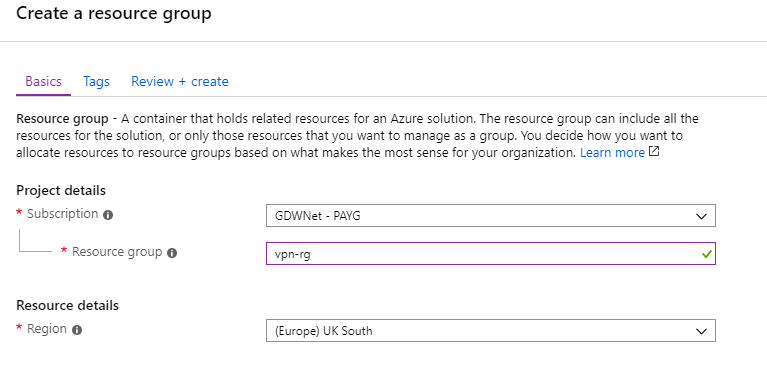
In order to get the VPN up and running there are a few things I need to setup on the Azure side. The very first thing I am going to need is a resource group that will contain all the resources that I will use for this article.
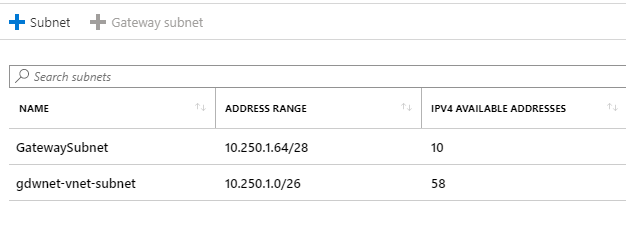
Once created, I need to set up a virtual network for the Azure side of things, while the Azure network is 10.250.1.0/24 it will contain two subnets. The first subnet is for the resources I want to spin up in Azure and will have a subnet mask of 10.250.1/26 which gives me 59 usable IP’s and the second subnet is 10.250.1.65/28 providing 11 IP addresses that are basically “reserved” for the gateway subnet.
The gateway subnet is where Azure will create the necessary resources for the VPN side of things.
Now I have the basics of the network setup I need to tell Azure what IP range I am using on the lab network, this is the network where I will be connecting FROM. To do this, I need to go to local network gateways and enter the address space that I have hosted in the home lab and the external IP address of my internet connection.
That is the local network setting taken care of; the next thing to do is to set up the Azure side of the VPN connection, to do that I need to go to Virtual Network Gateways and create a new network gateway.
The virtual network gateway has a few options that I’ll go through:
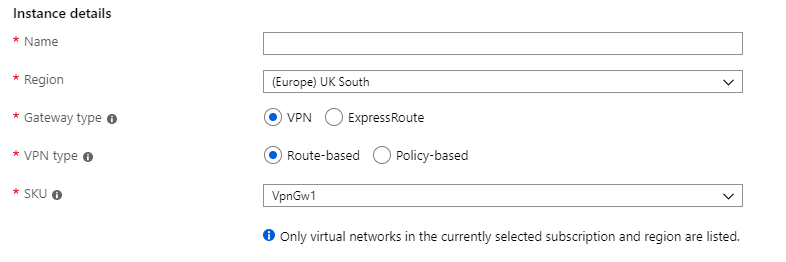
Most of the settings above will work, the interesting one here is “SKU” which is basically a type of VPN. If you click on the down arrow you will see:
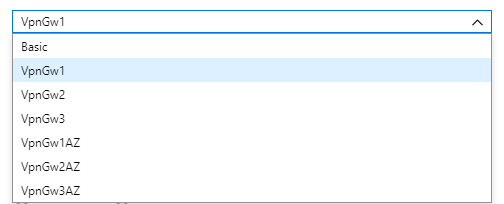
These VPN options cost more in descending value. The basic option is fine for a very simple site to site VPN but if you are hosting this in production then you really want to use at least the VpnGw1 option.
Once setup, the virtual network connection will give you an Azure public IP, this is the IP that you will need to connect to from the on prem side of things.
Now that the VPN elements have been set up on the Azure side, it is time to do the same for the on prem side.
In PFSense, this is all set up under VPN -> IPSEC
To add a new IPSEC connection, click on “Add P1” at the bottom of the page.
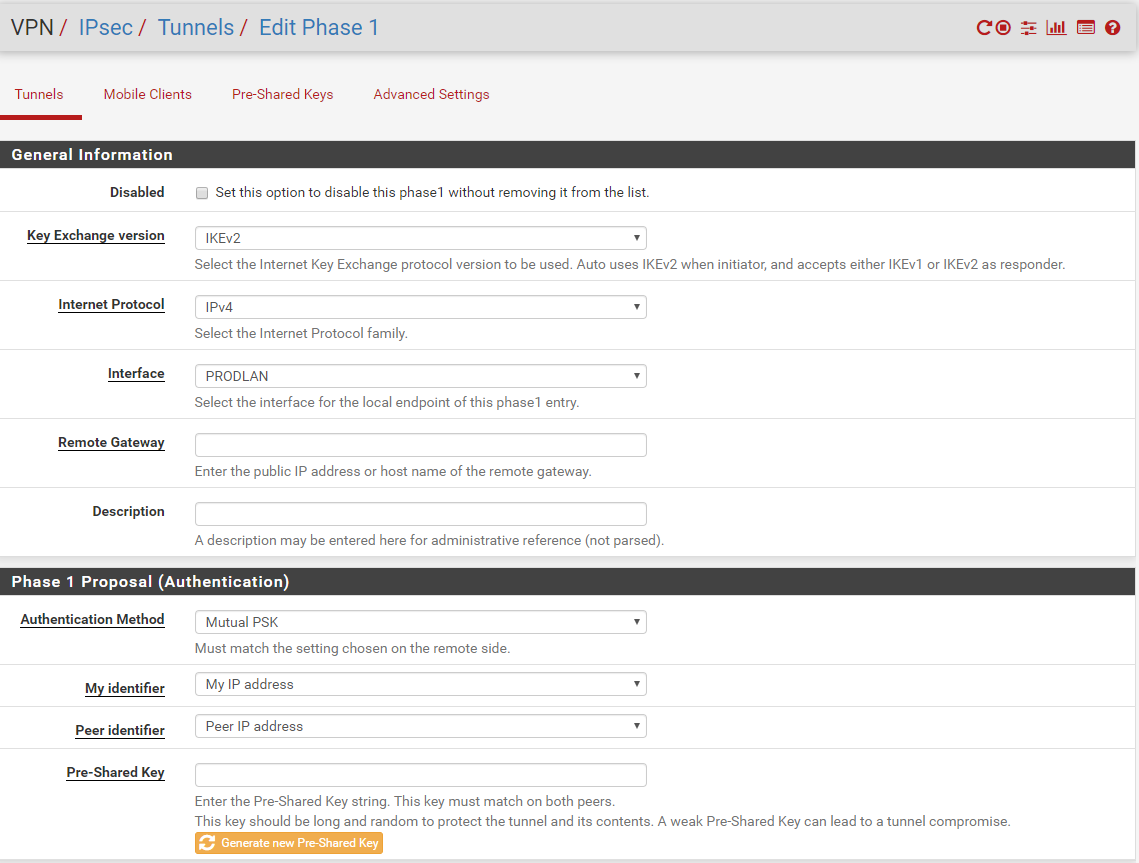
You will need to change the Key exchange to IKEv2 and I always get PFSense to generate the pre-shared key as it generates keys that are about as secure as it is possible to get.
The Remote Gateway is the Azure IP created during when the virtual network gateway was setup in the previous step.
Once the Phase 1 entry has been setup, ok the page and then click on Add P2.
The only thing that needs to be added to the phase 2 page is the Remote Network IP range for Azure, in my example that is 10.250.1.0/24
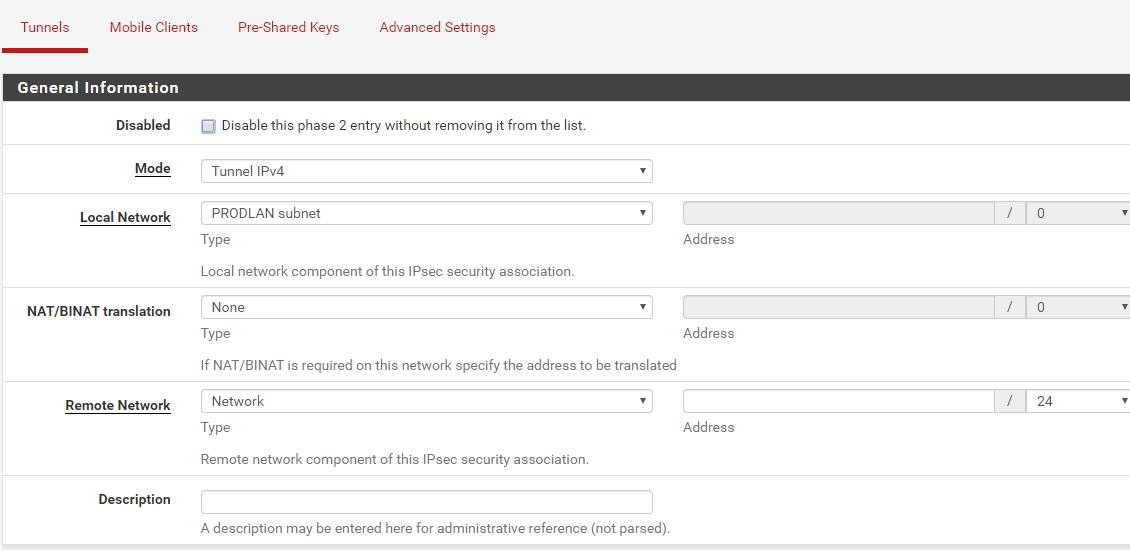
Save these setting.
The VPN is almost complete but now it needs to all be tied together. To do this, go back to the Azure page and find connections under all services.
For the first part of the setup, ensure that the connection type is ipsec.
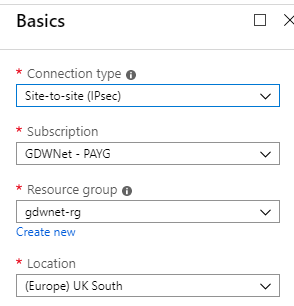
Once done, click on OK
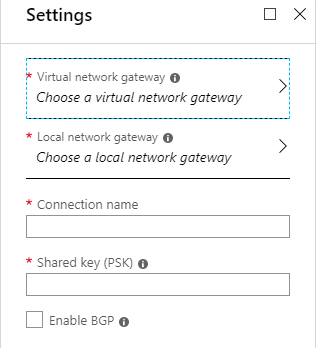
For the settings page, select the virtual and local network gateways that you created and give the connection a name and enter the pre-shared key that you got PFsense to create earlier, save your changes and wait for Azure to create the connection, this can take some time. When I was testing this process out it took over half an hour for the connection to be created.
Finally, go back to PFSense, click on Status -> IPSEC and if required, hit connect. The VPN should come up and you should have site to site routing.

And that is how you create a site to site VPN using the native Azure tools. When I first tried this I had a few issues with my account that I needed Azure support to fix for me. I should also point out that this approach is not the cheapest as you end up paying for the public IP, VPN connection, traffic and so on. In a future blog article I will show another method for creating a site to site VPN that may work out cheaper depending on your use case.
Subscribe to Ramblings of a Sysadmin
Get the latest posts delivered right to your inbox